iOS
I. Thiết lập XCode project
Bước 1: Tải portsipSDK tại đây
Bước 2: Khai báo permission sử dụng Microphone, Camera (để gọi video) trong file Info.plist

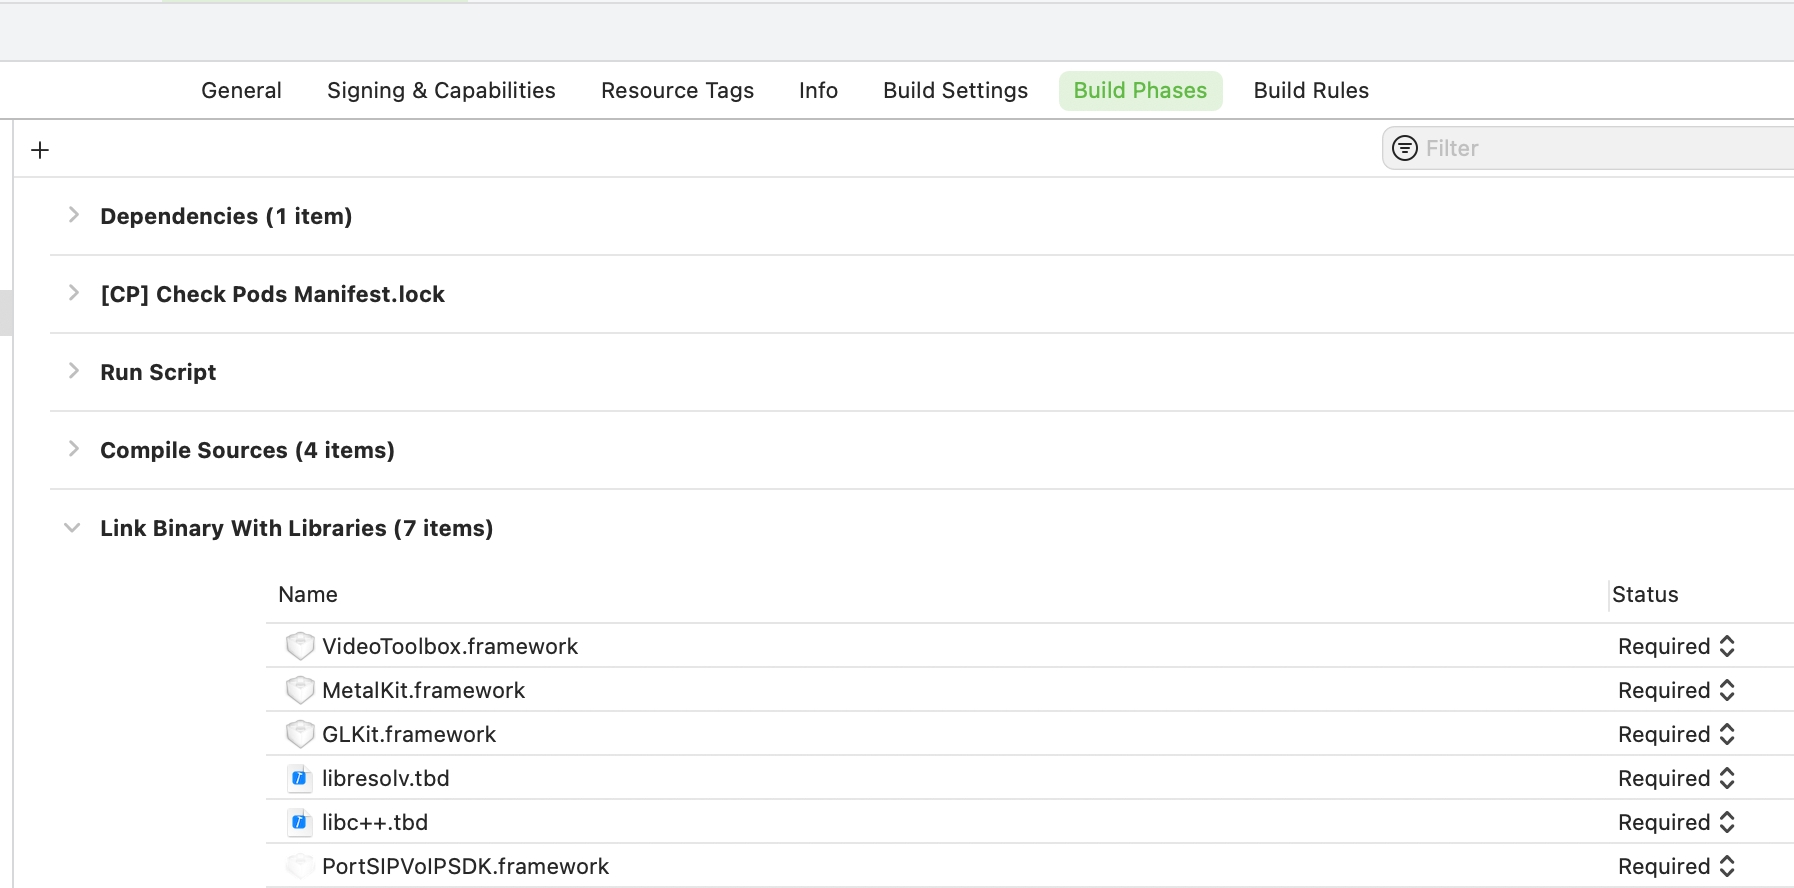
Bước 3: Add các thư viện, frameworks này vào TARGETS → Tên App trong XCode
Các thư viện VideoToolbox, MetalKit, GLKit, libresolv.tbd, libc++.tbd thì được XCode hỗ trợ sẵn, chỉ việc bấm dấu "+" và search tên thư viện rồi add vào.
PortSIPVoIPSDK.framework
nằm trong thư mụciOSSample
được giải nén từ file.zip
download ở bước 1.

chú ý TARGETS không phải PROJECT
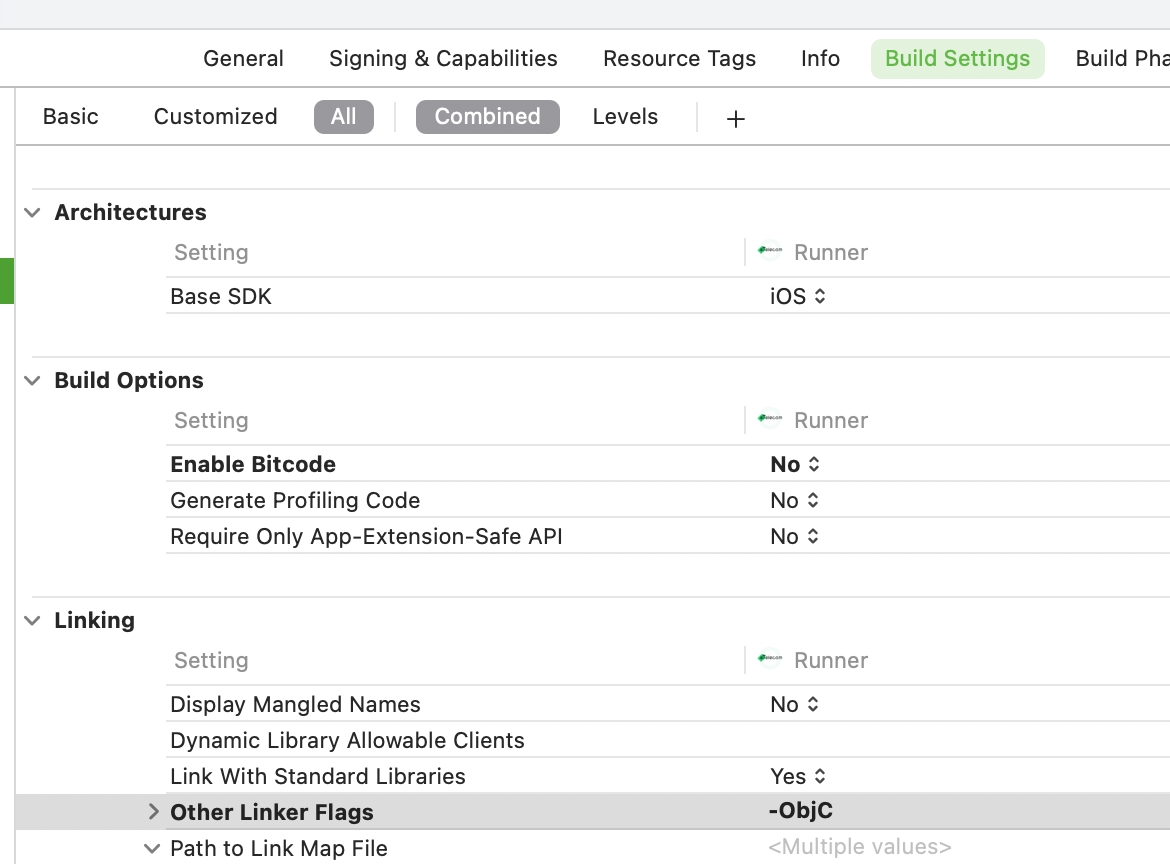
Bước 4: Trong Build Settings
→ Linking
→ Other Linker Flags
: thêm vào giá trị -ObjC

Tài liệu tham khảo: https://www.portsip.com/docs/sdk/manual/portsip-voip-sdk-user-manual-ios.pdf
II. Khởi tạo SDK
Bước 1: Khai báo biến global let portsipSDK: PortSIPSDK! = PortSIPSDK()
. Dùng để gọi các API của PortsipSDK.
Bước 2: Mở file Runner-Bridging-Header.h
, import thêm dòng này vào #import <PortSIPVoIPSDK/PortSIPVoIPSDK.h>
Bước 3: Phải implement interface: **PortSIPEventDelegate
.** trong Class AppDelegate
func initPortsipSDK() {
portsipSDK.unInitialize()
portsipSDK.delegate = self
portsipSDK.enableCallKit(true)
portsipSDK.initialize(
TRANSPORT_TCP, localIP: "0.0.0.0", localSIPPort: Int32(10002), loglevel: PORTSIP_LOG_NONE, logPath: "",
maxLine: 8, agent: "PortSIP SDK for IOS", audioDeviceLayer: 0, videoDeviceLayer: 0,
tlsCertificatesRootPath: "", tlsCipherList: "", verifyTLSCertificate: false)
// những cấu hình liên quan đến Audio
portsipSDK.addAudioCodec(AUDIOCODEC_OPUS)
portsipSDK.addAudioCodec(AUDIOCODEC_G729)
portsipSDK.addAudioCodec(AUDIOCODEC_PCMA)
portsipSDK.addAudioCodec(AUDIOCODEC_PCMU)
portsipSDK.setAudioSamples(20, maxPtime: 60)
// những cấu hình liên quan đến Video
portsipSDK.addVideoCodec(VIDEO_CODEC_H264)
portsipSDK.addVideoCodec(VIDEO_CODEC_H263_1998)
portsipSDK.addVideoCodec(VIDEO_CODEC_VP8)
portsipSDK.addVideoCodec(VIDEO_CODEC_VP9)
portsipSDK.setVideoBitrate(-1, bitrateKbps: 512)
portsipSDK.setVideoFrameRate(-1, frameRate: 20)
portsipSDK.setVideoResolution(480, height: 640)
portsipSDK.setVideoNackStatus(true)
portsipSDK.setInstanceId(UIDevice.current.identifierForVendor?.uuidString)
portsipSDK.setLicenseKey("PORTSIP_UC_LICENSE")
}
Hàm này nên được gọi chung lúc với đăng nhập máy nhánh.
III. Đăng nhập máy nhánh (extension)
// Giải thích:
// username: extension_number (ví dụ: 1234, 5678, ...)
// password: extension_password (ví dụ: abcDefg123, xzyqerTT11, ...)
// domain: tenant_domain (ví dụ: voip.example.com, ...)
func registerPortsip(username: String, password: String, domain: String) {
portsipSDK.removeUser()
var code = portsipSDK.setUser(
username, displayName: username, authName: username, password: password, userDomain: domain,
sipServer: "sip.etelecom.vn", sipServerPort: Int32(5063),
stunServer: "", stunServerPort: 0, outboundServer: "", outboundServerPort: 0)
if code != 0 {
return
}
portsipSDK.unRegisterServer()
code = portsipSDK.registerServer(90, retryTimes: 0)
}
Nên có 1 biến portsipRegistered
dùng để lưu trạng thái đã register với portsip thành công hay chưa. Nếu đã register thành công thì chỉ cần gọi API refreshRegistration()
, không cần qua 2 bước initPortsipSDK()
và registerPortsip()
bên trên.
portsipSDK.refreshRegistration(0)
Nếu muốn register lại từ đầu thì phải Khởi tạo SDK lại như mục II.
⇒ Khi đăng nhập thành công: sự kiện onRegisterSuccess()
xảy ra.
⇒ Ngược lại, khi không thành công thì sự kiện onRegisterFailure()
xảy ra.
IV. Đăng xuất máy nhánh (extension)
portsipSDK.removeUser()
portsipSDK.unRegisterServer()
portsipSDK.unInitialize()
V. Thực hiện cuộc gọi (outgoing call)
Để thực hiện cuộc gọi:
_sessionID = portsipSDK.call(callee: String, sendSdp: Bool, videoCall: Bool)
// _sessionID là 1 biến global, khi một cuộc gọi bất kì được tạo ra thì sẽ có 1 session, biến _sessionID này sẽ lưu lại id của session đó.
// callee là số điện thoại user muốn gọi đến.
// sendSdp: có truyền lên Session Description Protocol hay không. Thường sẽ để bằng true
// videoCall: có thực hiện video call hay không.
Khi người nhận cuộc gọi chấp nhận cuộc gọi:
sự kiện onInviteAnswered()
xảy ra.
func onInviteAnswered(
_ sessionId: Int,
callerDisplayName: UnsafeMutablePointer<Int8>!,
caller: UnsafeMutablePointer<Int8>!,
calleeDisplayName: UnsafeMutablePointer<Int8>!,
callee: UnsafeMutablePointer<Int8>!,
audioCodecs: UnsafeMutablePointer<Int8>!,
videoCodecs: UnsafeMutablePointer<Int8>!,
existsAudio: Bool,
existsVideo: Bool,
sipMessage: UnsafeMutablePointer<Int8>!
) {}
Khi người nhận cuộc gọi từ chối cuộc gọi/cuộc gọi không được bắt máy/hay vì 1 lý do nào đó mà cuộc gọi không thành công:
sự kiện onInviteFailure()
xảy ra.
func onInviteFailure(
_ sessionId: Int,
reason: UnsafeMutablePointer<Int8>!,
code: Int32,
sipMessage: UnsafeMutablePointer<Int8>!
) {}-
Chủ động kết thúc cuộc gọi:
portsipSDK.hangUp(sessionId: Int)
VI. Nhận cuộc gọi (incoming call)
Cần áp dụng Portsip Mobile Push để ứng dụng có thể nhận cuộc gọi trong các trường hợp không active:
Người dùng không ở màn hình ứng dụng
Khoá màn hình
Kill app
6.1. Thiết lập mobile push
Để sử dụng mobile push, cần khai báo ứng dụng iOS với hệ thống portsip thông qua các bước:
Tạo certificate cho VoIP Push và APN Push cho app iOS
Tạo ra 1
Apple Certificate file
vàApple Private key file (no password)
(2 file.pem
)Gửi cho eTelecom 2 file này để tạo thêm Mobile Push
Xem chi tiết tại: https://www.portsip.com/ios-mobile-push-portsip-pbx mục 4,5 và 9
6.2. Hiện thực
Khi có một cuộc gọi đến máy nhánh:
Sự kiện onInviteIncoming()
xảy ra.
func onInviteIncoming(
_ sessionId: Int,
callerDisplayName: UnsafeMutablePointer<Int8>!,
caller: UnsafeMutablePointer<Int8>!,
calleeDisplayName: UnsafeMutablePointer<Int8>!,
callee: UnsafeMutablePointer<Int8>!,
audioCodecs: UnsafeMutablePointer<Int8>!,
videoCodecs: UnsafeMutablePointer<Int8>!,
existsAudio: Bool,
existsVideo: Bool,
sipMessage: UnsafeMutablePointer<Int8>!
) {
}
Để nhận được cuộc gọi: cần phải sử dụng Portsip Mobile Push, các service của iOS như CallKit, ForceBackground, PushKit.
Liên hệ eTelecom để tạo thêm Mobile Push
Bật những tính năng này trên XCode:

Tham khảo về CallKit: https://developer.apple.com/documentation/callkit(opens new window)
Khai báo các biến global sau đây:
voipRegistry: PKPushRegistry! = PKPushRegistry(queue: DispatchQueue.main)
. Dùng để khai báo về việc nhận notification từ Portsip Mobile Push._VoIPPushToken: String = ""
. Token dùng để nhận notification VoIP._APNsPushToken: String = ""
. Token dùng để nhận notification chung._cxProvider: CXProvider!
. Dùng để hiển thị popup cuộc gọi đến_cxCallController: CXCallController = CXCallController()
. Dùng để thao tác với các cuộc gọi CallKit như ngắt máy, bắt máy, ...
class AppDelegate
implement thêm các interface sau: UIApplicationDelegate
, PKPushRegistryDelegate
, CXProviderDelegate
class AppDelegate
import thêm các service sau: PushKit
, UserNotifications
, CallKit
Phải có tối thiểu 2 hàm application()
ở file AppDelegate.swift
1 hàm application mặc định. Tại đây, enable CallKit (để có thể nhận cuộc gọi, nghe-gọi khi ở background mode), PushNotification (để sử dụng Portsip Mobile Push), ForceBackground (để app chạy ở chế độ background)
func application(
_ application: UIApplication,
didFinishLaunchingWithOptions launchOptions: [UIApplication.LaunchOptionsKey: Any]?
) -> Bool {
UserDefaults.standard.register(defaults: ["CallKit": true])
UserDefaults.standard.register(defaults: ["PushNotification": true])
UserDefaults.standard.register(defaults: ["ForceBackground": true])
}
1 hàm application dùng để lấy device token dùng cho việc nhận notification
func application(
_ application: UIApplication,
didRegisterForRemoteNotificationsWithDeviceToken deviceToken: Data
) {
let tokenParts = deviceToken.map { data in String(format: "%02.2hhx", data) }
_APNsPushToken = tokenParts.joined()
updatePushStatusToSipServer() **// khai báo Header dùng để gọi API Register với Portsip. Sẽ nói ở bước 9.**
}
Phải có tối thiểu 2 hàm pushRegistry()
ở file AppDelegate.swift
1 hàm pushRegistry dùng để lấy token dùng cho việc nhận notification VoIP
func pushRegistry(_: PKPushRegistry, didUpdate pushCredentials: PKPushCredentials, for _: PKPushType) {
let tokenParts = pushCredentials.token.map { data in String(format: "%02.2hhx", data) }
_VoIPPushToken = tokenParts.joined()
updatePushStatusToSipServer() **// khai báo Header dùng để gọi API Register với Portsip. Sẽ nói ở bước 9.**
}
1 hàm pushRegistry dùng để hứng notification VoIP từ Portsip Mobile Push. Khi có cuộc gọi đến, thì portsip sẽ bắn notification về cho thiết bị của người dùng.
func pushRegistry(_: PKPushRegistry, didReceiveIncomingPushWith payload: PKPushPayload, for _: PKPushType) {
**// Nếu không muốn nhận notification VoIP khi app đang active thì check điều kiện này.**
if UIApplication.shared.applicationState == .active {
return
}
processPushMessageFromPortPBX(payload.dictionaryPayload, completion: {}) **// Dùng CallKit để thông báo cuộc gọi đến. Sẽ nói ở bước 10.**
}
Khai báo Header với _VoIPPushToken và _APNsPushToken trước khi gọi API Register
hay RefreshRegistration
của portsipSDK (mục II bước 1).
func updatePushStatusToSipServer() {
if _VoIPPushToken.isEmpty || _APNsPushToken.isEmpty {
return
}
**portsipSDK.clearAddedSipMessageHeaders()**
let bundleIdentifier: String = Bundle.main.bundleIdentifier!
let token = "\(_VoIPPushToken)|\(_APNsPushToken)"
let pushMessage = "device-os=ios;device-uid=\(token);allow-call-push=true;allow-message-push=true;app-id=\(bundleIdentifier)"
**portsipSDK.addSipMessageHeader(-1, methodName: "REGISTER", msgType: 1, headerName: "x-p-push", headerValue: pushMessage)**
}
Dùng CallKit để thông báo cuộc gọi đến, có thể hiện thực như sau:
func processPushMessageFromPortPBX(_ dictionaryPayload: [AnyHashable: Any], completion: () -> Void) {
/* dictionaryPayload JSON Format
Payload: {
"message_id" = "96854b5d-9d0b-4644-af6d-8d97798d9c5b";
"msg_content" = "Received a call.";
"msg_title" = "Received a new call";
"msg_type" = "call";// im message is "im"
"x-push-id" = "pvqxCpo-j485AYo9J1cP5A..";
"send_from" = "102";
"send_to" = "sip:[email protected]";
}
*/
let parsedObject = dictionaryPayload
let pushId = dictionaryPayload["x-push-id"]
// _callUUID là 1 biến global để dùng trong việc thông báo cuộc gọi đến bằng CallKit
if pushId != nil {
let uuidStr = pushId as! String
_callUUID = UUID(uuidString: uuidStr)
}
if _callUUID == nil {
return
}
let handle = CXHandle(type: .generic, value: _callerParsed)
let update = CXCallUpdate()
update.remoteHandle = handle
update.supportsDTMF = false
update.hasVideo = false
update.supportsGrouping = false
update.supportsUngrouping = false
update.supportsHolding = false
let infoDic = Bundle.main.infoDictionary!
let localizedName = infoDic["CFBundleName"] as! String
let providerConfiguration = CXProviderConfiguration(localizedName: localizedName)
providerConfiguration.supportsVideo = true
providerConfiguration.maximumCallsPerCallGroup = 1
providerConfiguration.supportedHandleTypes = [.phoneNumber]
_cxProvider = CXProvider(configuration: providerConfiguration)
_cxProvider.setDelegate(self, queue: DispatchQueue.main)
_cxProvider.reportNewIncomingCall(with: _callUUID, update: update, completion: {})
}
Một số thao tác user có thể thực hiện khi có cuộc gọi từ CallKit: Chấp nhận (bắt máy), Từ chối, Ngắt máy (sau khi đã chấp nhận), ...
// 1. Khi người dùng bấm vào nút Chấp nhận cuộc gọi ✅
func provider(_ provider: CXProvider, perform action: CXAnswerCallAction) {
if portsipSDK.answerCall(sessionId: Int, videoCall: Bool) {
action.fulfill()
} else {
action.fail()
}
}
// 2. Khi người dùng bấm từ chối/kết thúc cuộc gọi ❌
func provider(_ provider: CXProvider, perform action: CXEndCallAction) {
if (_sessionID <= 0) {
action.fulfill()
return
}
var _result = false
if (***cuộc gọi đã được chấp nhận và đang diễn ra***) {
_result = portsipSDK.hangUp(sessionId: Int)
} else {
// code nên có giá trị là 486
_result = portsipSDK.rejectCall(sessionId: Int, code: Int)
}
if (_result) {
action.fulfill()
} else {
action.fail()
}
}
// 3. Khi cuộc gọi bắt đầu, startAudio để mở microphone và speaker.
func provider(_: CXProvider, didActivate _: AVAudioSession) {
portsipSDK.startAudio()
}
// 4. Khi cuộc gọi kết thúc, stopAudio để tắt microphone và speaker.
func provider(_: CXProvider, didDeactivate _: AVAudioSession) {
portsipSDK.stopAudio()
}
Khi cuộc gọi kết thúc, để tắt màn hình gọi điện của CallKit đi:
func reportClosedCall() {
if _callUUID != nil {
let endCallAction = CXEndCallAction(call: _callUUID)
let transaction = CXTransaction(action: endCallAction)
_cxCallController = CXCallController()
_cxCallController.request(transaction) { error in
if let error = error {
print("Error requesting transaction: \(error)")
} else {
print("Requested transaction successfully")
}
}
}
}
Khi người dùng tắt app, tắt màn hình điện thoại hoặc kill app thì cần phải giữ cho portsipSDK awake, để ứng dụng luôn sẵn sàng nhận cuộc gọi đến.
func applicationDidEnterBackground(_: UIApplication) {
portsipSDK.startKeepAwake()
}
// Khi người dùng mở app lại thì ngưng việc giữ cho portsipSDK awake đi.
func applicationWillEnterForeground(_: UIApplication) {
portsipSDK.stopKeepAwake()
}
VII. Cuộc gọi video
Đầu tiên, ta tạo 1 file swift (ví dụ: VideoCallViewController.swift) kế thừa UIViewController
. File này sẽ được link với 1 ViewController
được tạo ra qua các bước 2 và 3
.
class VideoCallViewController : UIViewController {
// do something...
}
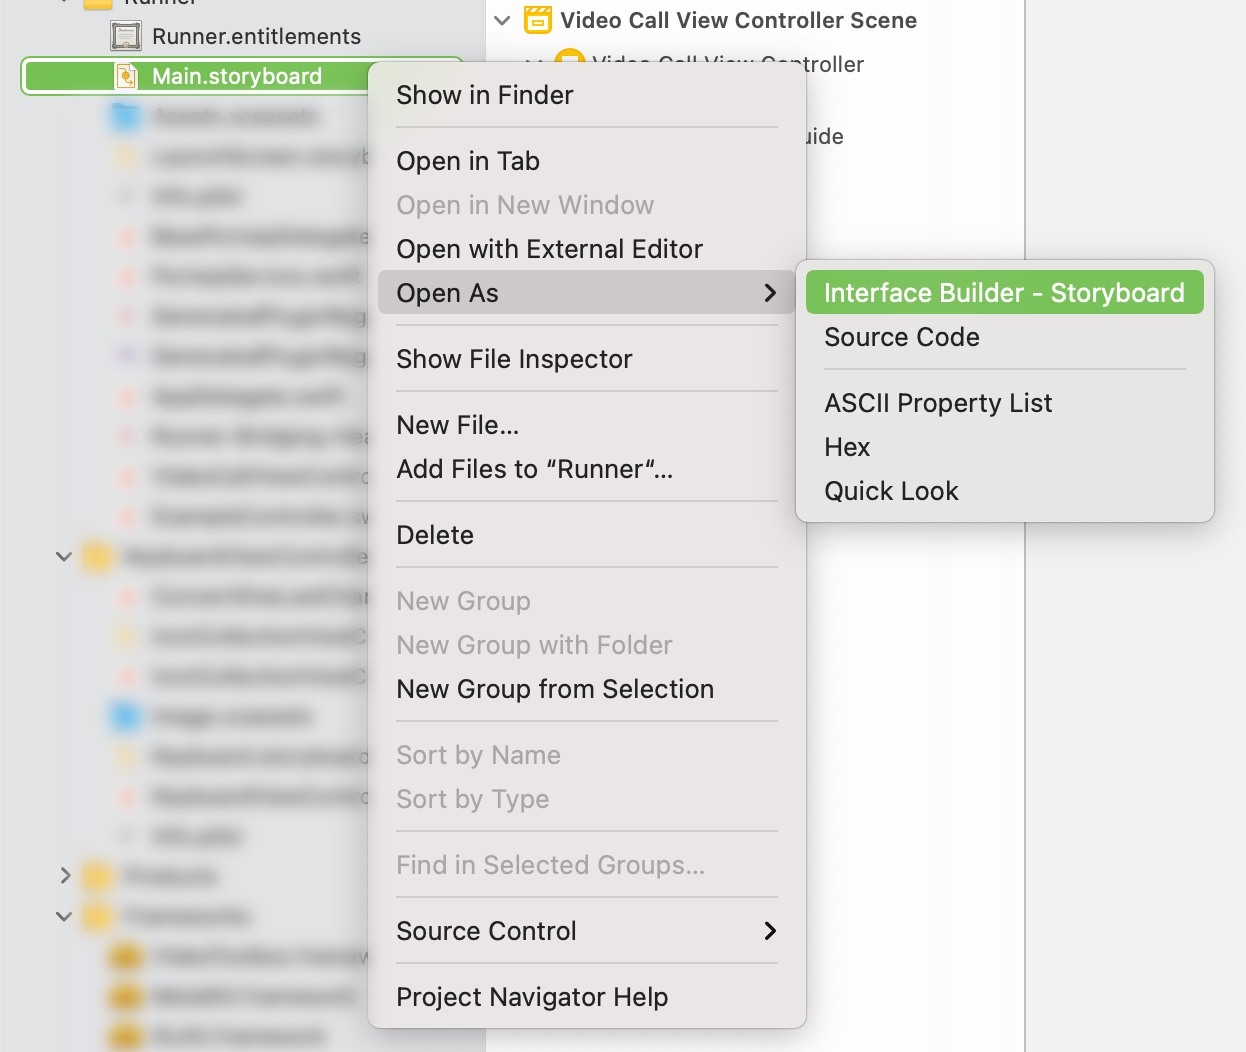
Open file Main.storyboard
dưới dạng Interface Builder
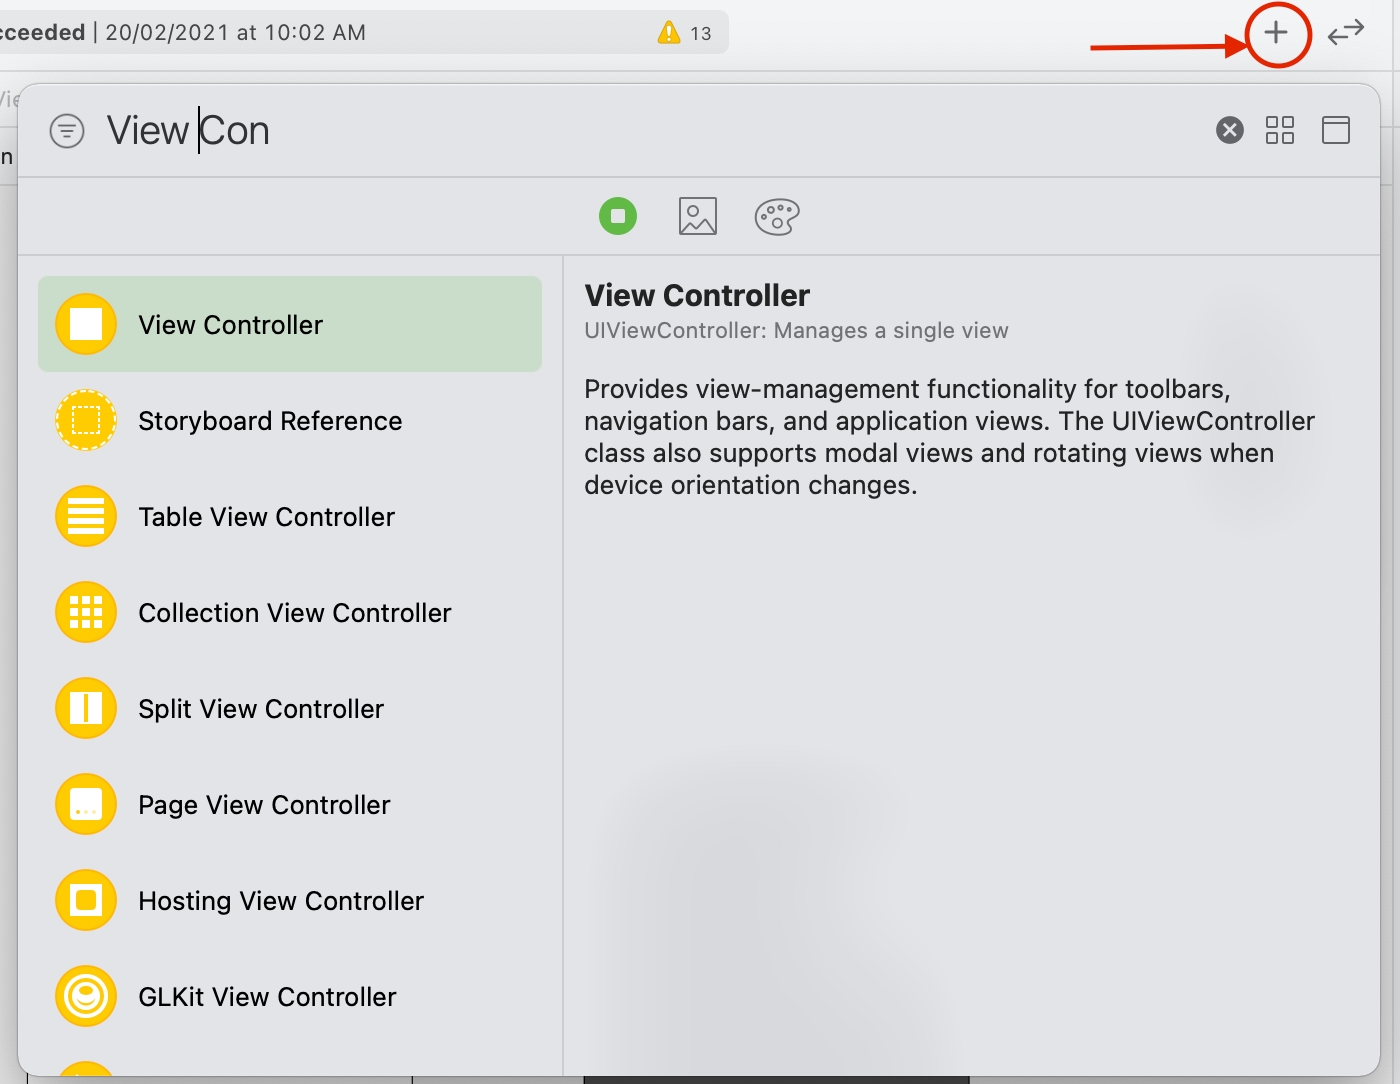
Tạo 1 ViewController (ví dụ: VideoCallViewController). Bấm dấu "+" phía góc phải-trên của màn hình xCode ⇒ search từ "View Controller" ⇒ Double Click hoặc Enter.
⇒ Ta sẽ có 1 ViewController như thế này:
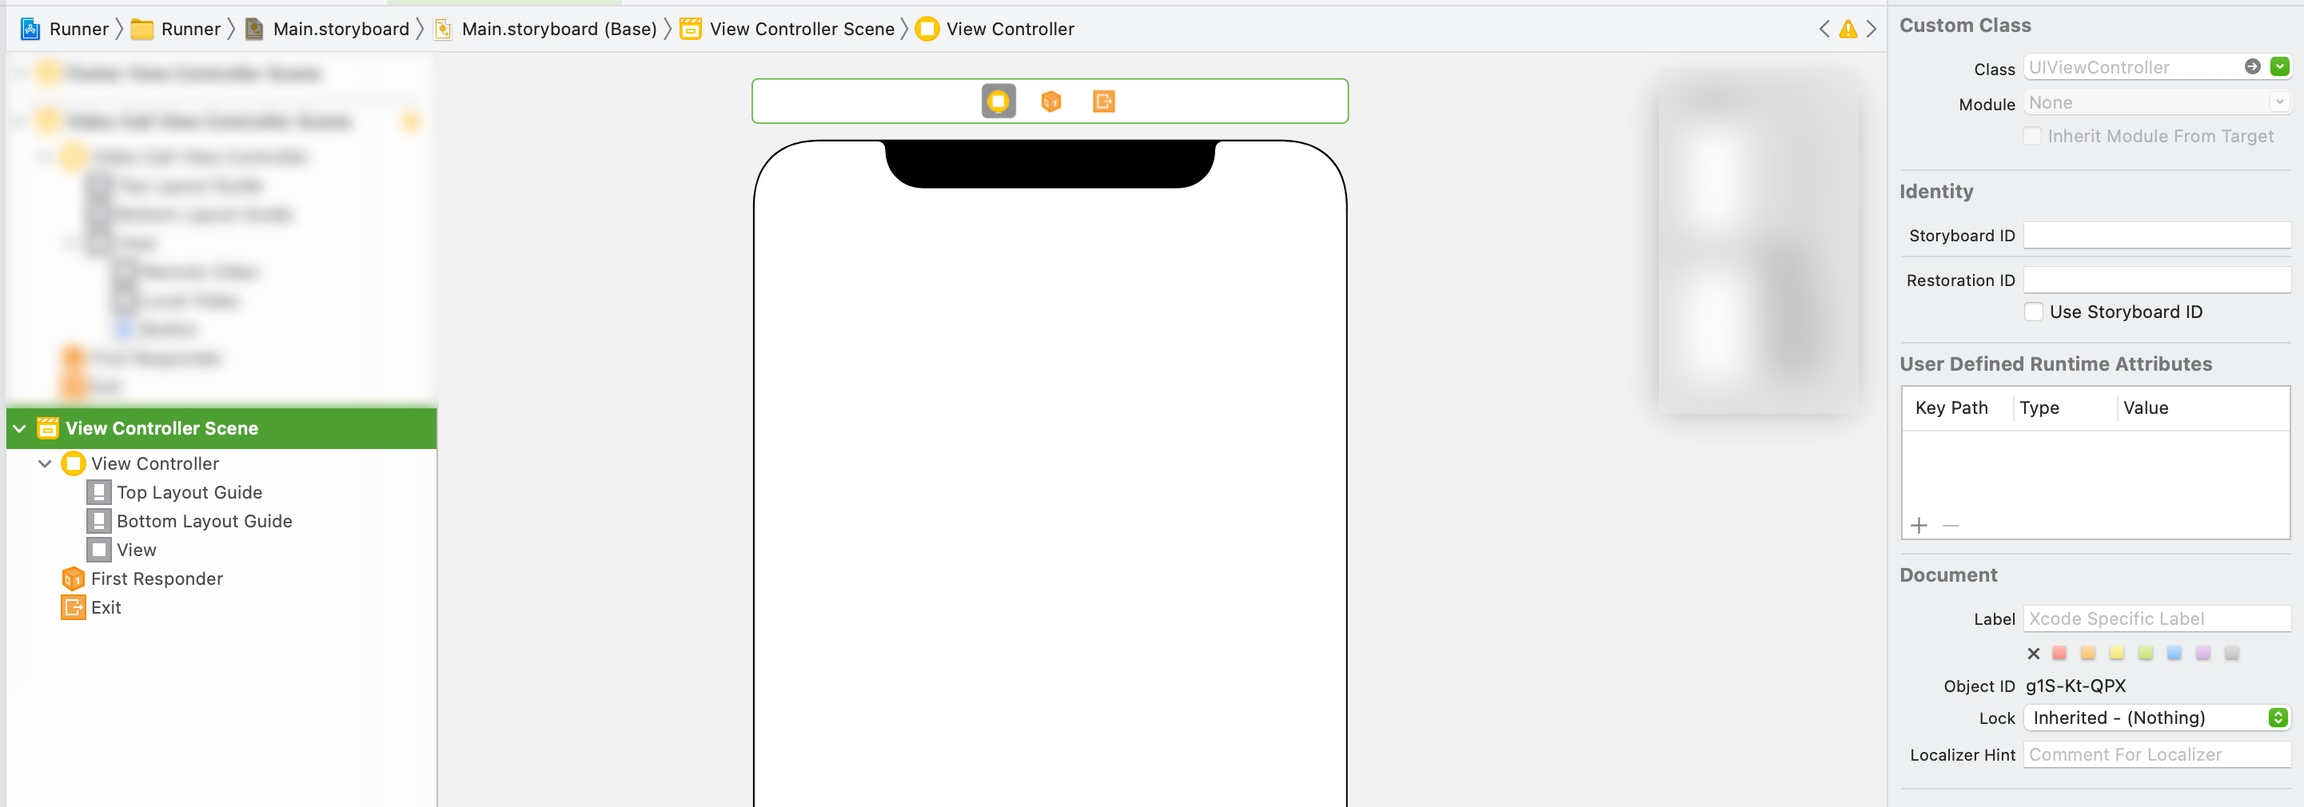
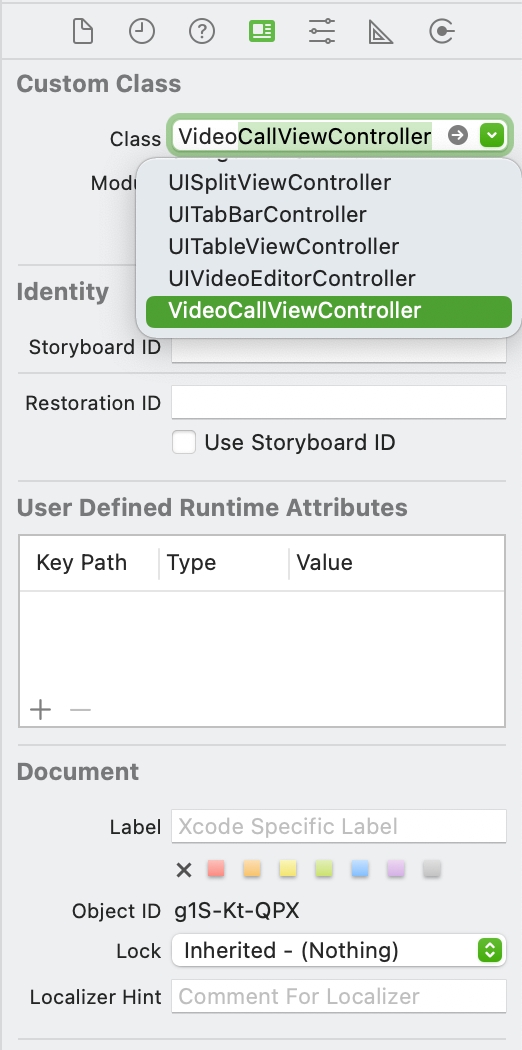
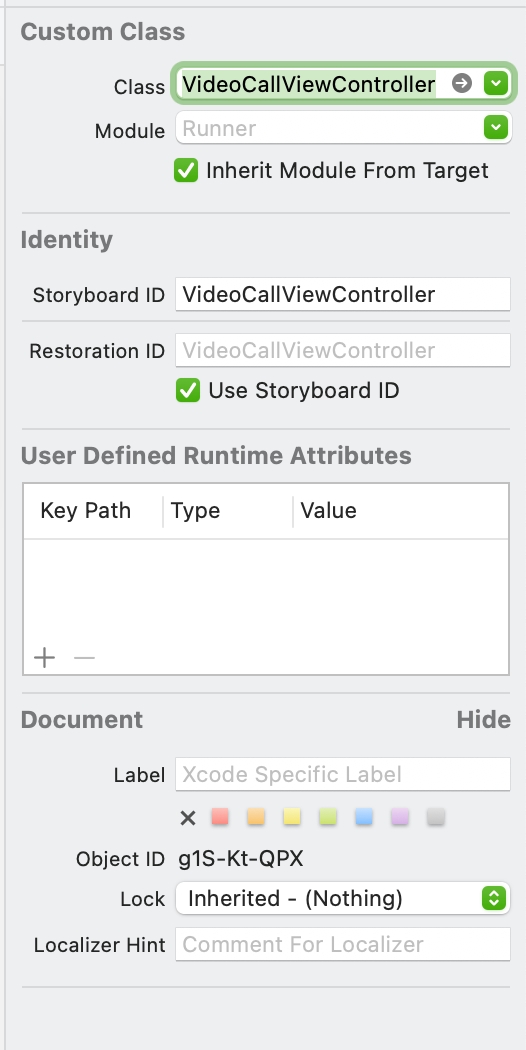
Tại màn hình này, ở phần Custom Class
ở bên phải, ta tìm và chọn class VideoCallViewController được tạo trước ở bước 1
.

Sau đó, ở phần Identity
, mục Storyboard ID
ta tuỳ ý đặt cho ViewController này 1 ID, đồng thời check vào checkbox Use Storyboard ID
bên dưới.
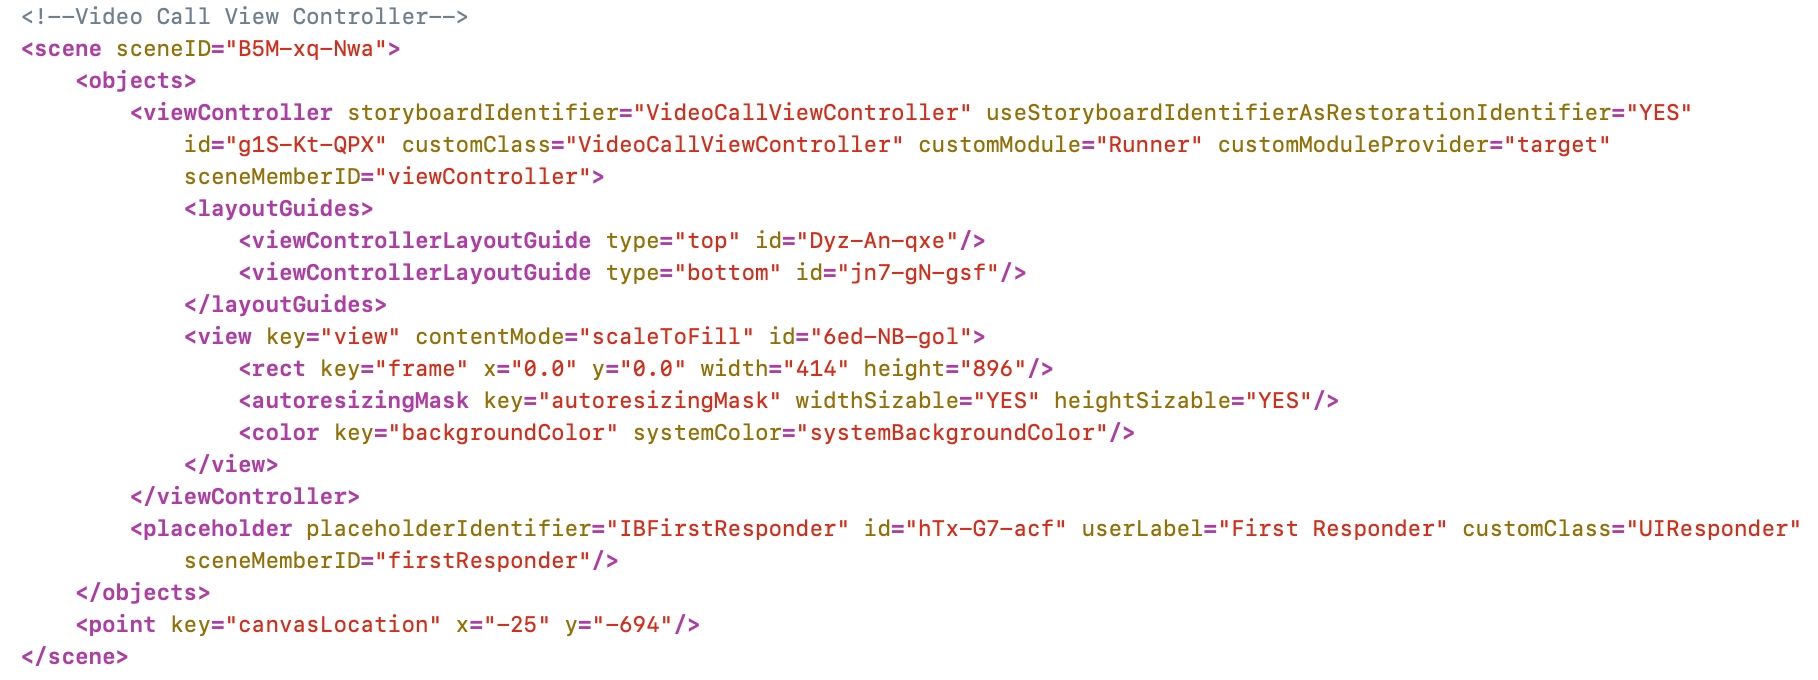
⇒ Thử Open file Main.storyboard
dưới dạng Source Code
, ta sẽ thấy đoạn code như sau:

Trong ViewController này, ta tiến hành dựng các component cần thiết (1 vùng để chứa RemoteVideo - tức video từ phía khách hàng, 1 vùng để chứa LocalVideo - tức video của chính bạn, 1 button để Kết thúc cuộc gọi, các button như Bật/Tắt loa ngoài, chuyển đổi Camera trước và sau, ...)
Tạo 2 connection outlets, dùng để gắn video vào 2 vùng RemoteVideo và LocalVideo. Cách gắn sẽ trình bày ở bước sau.
Ở đoạn code demo bên dưới, chỉ bao gồm 1 vùng để chứa RemoteVideo, 1 vùng để chứa LocalVideo, 1 button để Kết thúc cuộc gọi.
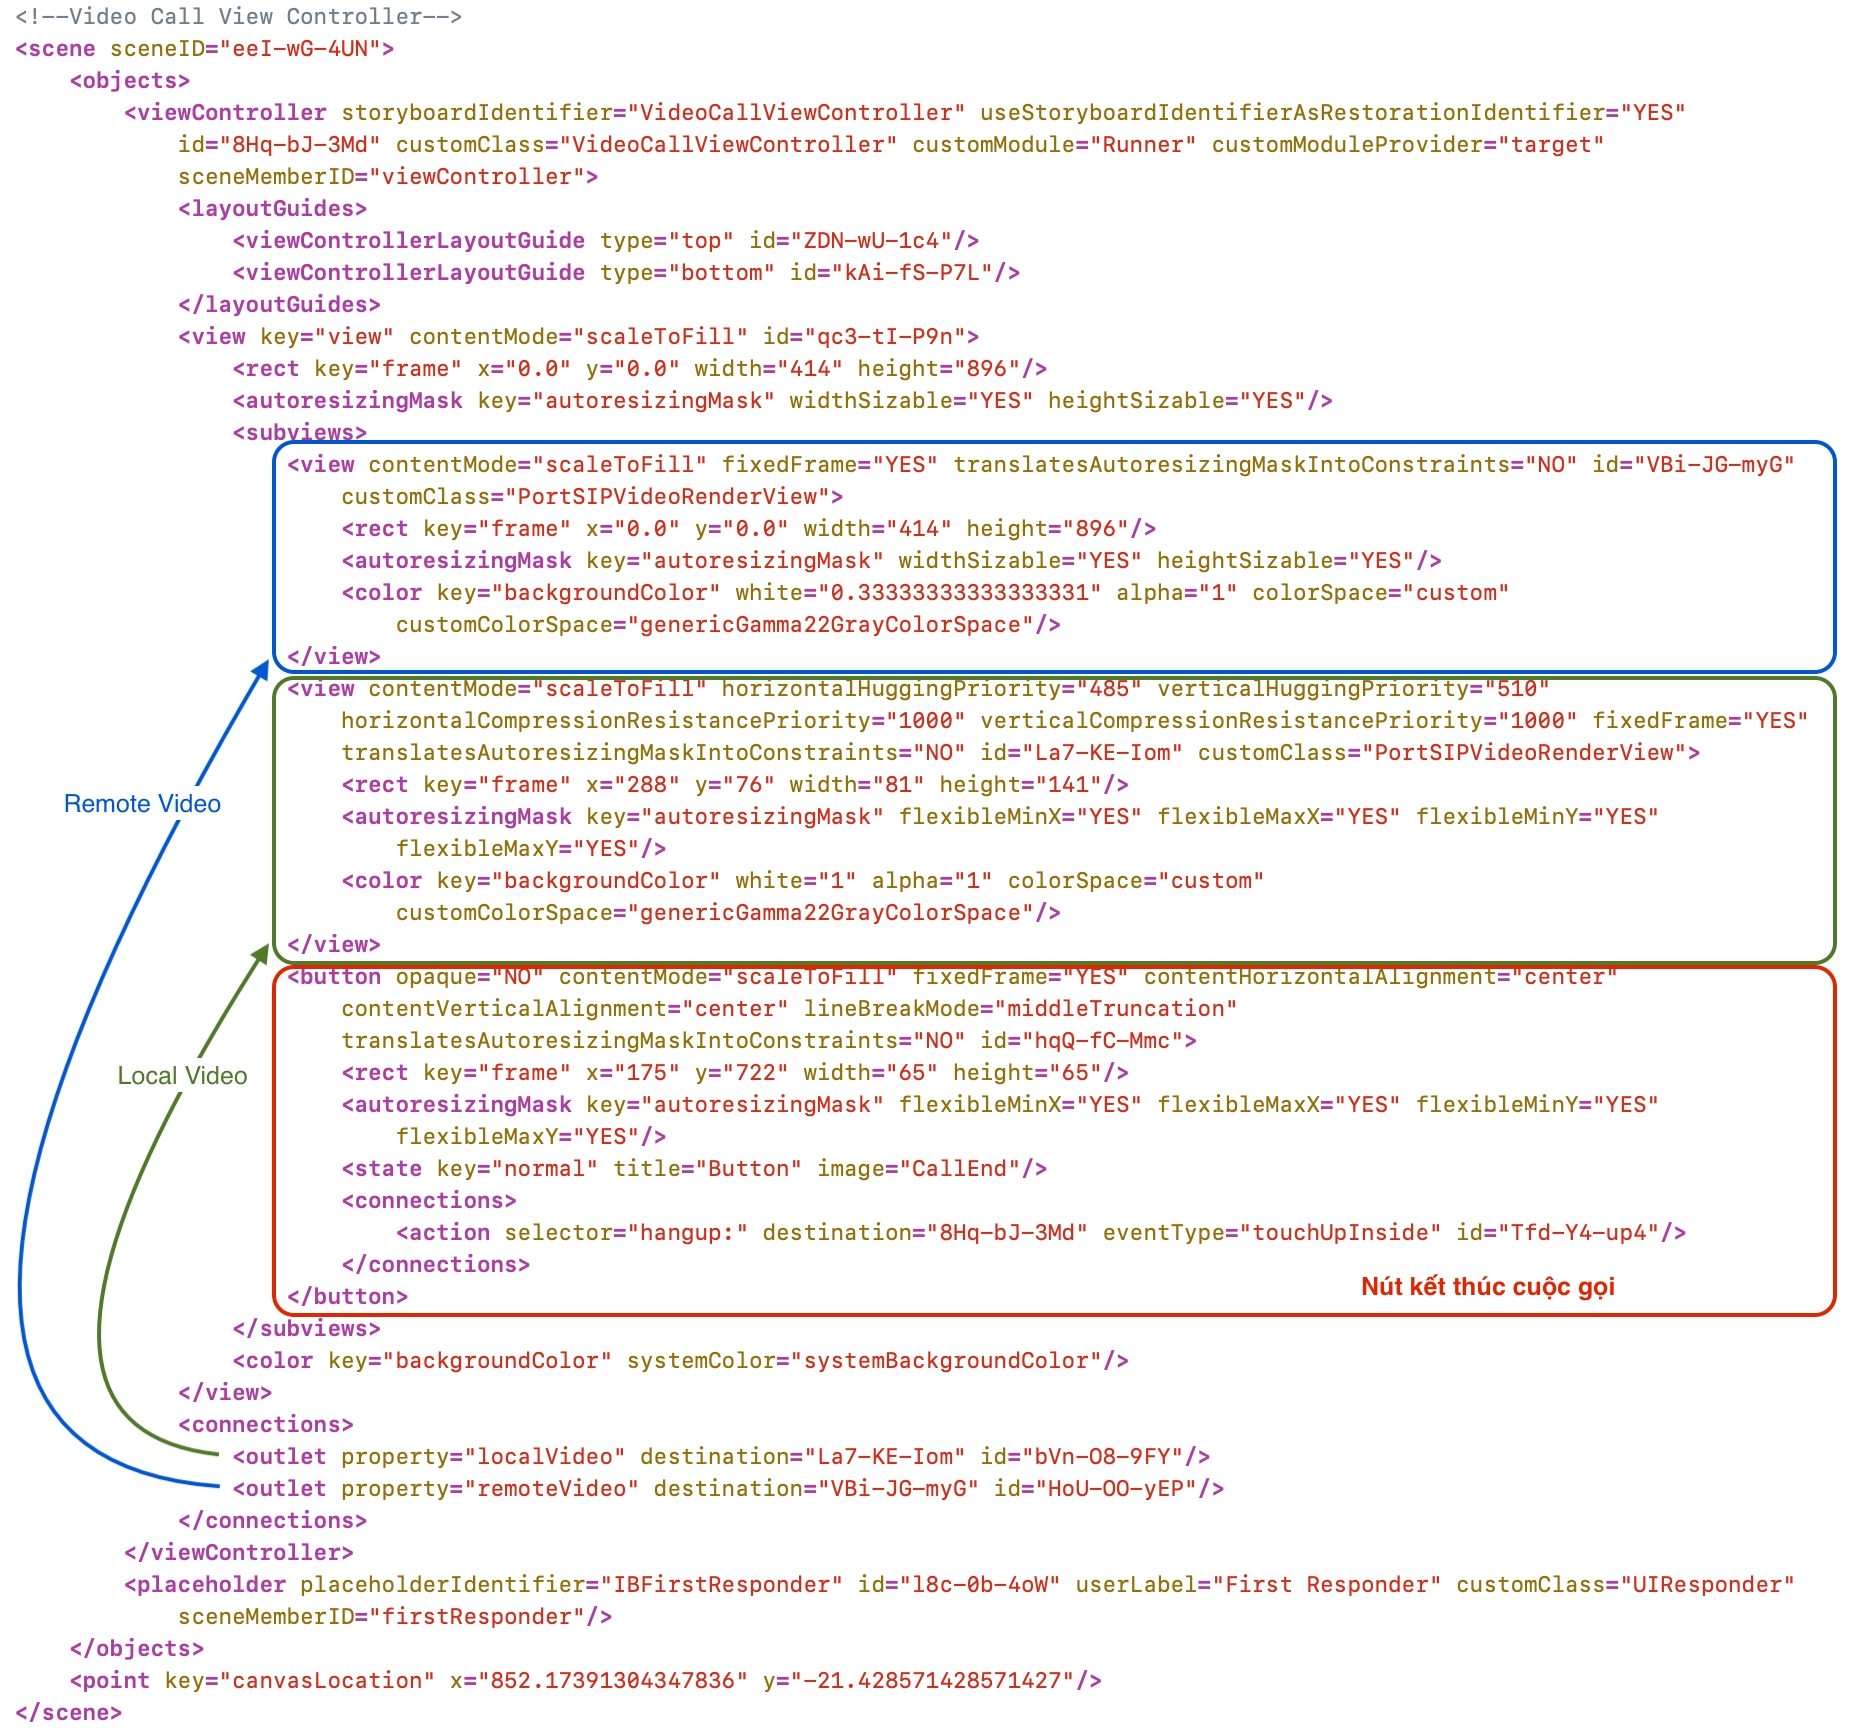
Trong file VideoCallViewController.swift
(đã tạo ở bước 1), khai báo các biến sau:
// dùng để gán portsipSDK ở AppDelegate.swift vào VideoCallViewController.swift => dùng để gọi API Portsip.
var portSIPSDK: PortSIPSDK!
// dùng để gán sessionId ở AppDelegate.swift vào VideoCallViewController.swift => khi gắn video vào vùng RemoteVideo thì cần có sessionId.
var sessionId: Int = 0
Trong file AppDelegate.swift
:
Khai báo thêm biến
var videoCallView: VideoCallViewController!
.Khi đăng nhập máy nhánh thành công, sự kiện
onRegisterSuccess()
xảy ra, trong sự kiện này, khởi tạo các giá trị cho VideoCallView:
func onRegisterSuccess(
_ reason: UnsafeMutablePointer<Int8>!,
statusCode: Int32,
sipMessage: UnsafeMutablePointer<Int8>!
) {
let storyboard = UIStoryboard(name: "Main", bundle: nil)
videoCallView = storyboard?.instantiateViewController(withIdentifier: "VideoCallViewController") as! VideoCallViewController
// giao diện cuộc gọi video sẽ có dạng full màn hình.
videoCallView.modalPresentationStyle = .fullScreen
// gán portsipSDK của AppDelegate vào portsipSDK của VideoCallViewController => 2 biến này phải bằng nhau thì gọi các api của Portsip mới không bị lỗi.
videoCallView.portsipSDK = portsipSDK
}
Thực hiện cuộc gọi video, gọi hàm call()
với tham số videoCall
= true
_sessionID = portsipSDK.call(phoneNumber, sendSdp: true, videoCall: true)
// _sessionID là 1 biến global, khi một cuộc gọi bất kì được tạo ra thì sẽ có 1 session, biến _sessionID này sẽ lưu lại id của session đó.
// phoneNumber là số điện thoại user muốn gọi đến.
// sendSdp: có truyền lên Session Description Protocol hay không.
// videoCall: có thực hiện video call hay không.
⇒ Khi người được gọi nhấc máy: sự kiện onInviteAnswered()
xảy ra.
func onInviteAnswered(
_ sessionId: Int,
callerDisplayName: UnsafeMutablePointer<Int8>!,
caller: UnsafeMutablePointer<Int8>!,
calleeDisplayName: UnsafeMutablePointer<Int8>!,
callee: UnsafeMutablePointer<Int8>!,
audioCodecs: UnsafeMutablePointer<Int8>!,
videoCodecs: UnsafeMutablePointer<Int8>!,
existsAudio: Bool,
existsVideo: Bool,
sipMessage: UnsafeMutablePointer<Int8>!
) {
// gán sessionId của videoCallView
videoCallView.sessionId = sessionId
// TODO: mở view VideoCallViewController lên.
// Có nhiều cách để mở một UIViewController lên, trong ví dụ này, ta dùng cách 1 UIViewController mở 1 UIViewController khác lên bằng hàm present()
// RootViewController là ViewController có ID được gán vào attribute initialViewController ở thẻ document trong Main.storyboard (xem hình bên dưới)
let rootController = window?.rootViewController as? RootViewController
rootController.present(videoCallView, animated: true, completion: nil)
}

Trong file VideoCallViewController.swift
:
Khai báo thêm 2 biến
// Đây là 2 outlet ta tạo ra ở bước 4
@IBOutlet var remoteVideo: PortSIPVideoRenderView!
@IBOutlet var localVideo: PortSIPVideoRenderView!
Khi view được init lần đầu tiên, ta phải gọi hàm initVideoRender() cho remoteVideo và localVideo.
override func viewDidLoad() {
localVideo.initVideoRender()
remoteVideo.initVideoRender()
}
Khi view đã hiển thị, gắn video cho localVideo và remoteVideo.
override func viewDidAppear(_ animated: Bool) {
// localVideo - video của chính bạn
portsipSDK.setLocalVideoWindow(localVideo)
portsipSDK.displayLocalVideo(true, mirror: true)
// remoteVideo - video của khách hàng
portsipSDK.setRemoteVideoWindow(sessionId, remoteVideoWindow: remoteVideo)
}
Khi bấm vào nút Kết thúc cuộc gọi:
@IBAction func hangup(_ sender: Any) {
// Tắt view videoCall đi.
dismiss(animated: true, completion: nil)
portsipSDK.hangUp(sessionId)
}
Khi view đã tắt, gỡ video hiện tại ra khỏi localVideo và remoteVideo.
override func viewDidDisappear(_ animated: Bool) {
portsipSDK.setLocalVideoWindow(nil)
portsipSDK.displayLocalVideo(false, mirror: false)
portsipSDK.setRemoteVideoWindow(sessionId, remoteVideoWindow: nil)
}
Khi có cuộc gọi đến, sự kiện onInviteIncoming()
xảy ra
func onInviteIncoming(
_ sessionId: Int,
callerDisplayName: UnsafeMutablePointer<Int8>!,
caller: UnsafeMutablePointer<Int8>!,
calleeDisplayName: UnsafeMutablePointer<Int8>!,
callee: UnsafeMutablePointer<Int8>!,
audioCodecs: UnsafeMutablePointer<Int8>!,
videoCodecs: UnsafeMutablePointer<Int8>!,
existsAudio: Bool,
existsVideo: Bool,
sipMessage: UnsafeMutablePointer<Int8>!
) {
// existsVideo để cho biết cuộc gọi hiện tại có phải là videoCall hay không.
}
⇒ Khi bạn nhấc máy:
let code = portsipSDK.answerCall(_sessionID, videoCall: isVideoCall)
if code != 0 {
return
}
if (isVideoCall) {
// tương tự như khi thực hiện cuộc gọi ra.
videoCallView.sessionId = _sessionID
let rootController = window?.rootViewController as? RootViewController
rootController.present(videoCallView, animated: true, completion: nil)
}
Last updated